Archive for Crafts

Paper Tree

I get spring fever early every year and want to bring some color into the house. This project fit the bill perfectly and was a lot of fun and super cheap! I used supplies I already had around the house.  Here’s what you need:

Scrapbook paper – If you don’t have any scrapbook paper, Walmart has awesome tablets for $5!

Floral wire – I used  26 gauge ($1.47 at Walmart)
Elmers Glue
Branches from your yard
Scissors
Newspaper
Cardboard
Vase

First, go out to your yard and cut some branches and put them in a vase. I found that live branches worked better than dead ones as the dead ones would break easily.

Next, you need to make a leaf template.  I cut out two different sized leaves from a piece of cardboard.

Next, take a sheet of scrapbook paper and fold it in half.  Trace your leaf pattern using your templates.  Cut out the leaves, lots and lots of leaves.

Lay some newspaper down, take your Elmer’s glue and run a few strips on the back side of one of your leaves.  Lay a piece of floral wire down the middle of the leaf and lay the other half of the leaf on top, sandwiching the floral wire in between the two leaves. Make sure the floral wire extends at least several inches outside of the leaf, kind of like a tail.

 
Attach the leaves to the branches by wrapping the floral wire around the branches, like this….

Arrange the leaves in a natural leaf pattern, like this….

(See how the floral wire made it look like the leaf had a vein right down the middle, just like in nature).  Fill up your branches with your leaves till you like how it looks.  Here’s how mine turned out….I love it!

.

Valentine’s Wreath

Talk about super easy…you can make this wreath in less than 10 minutes. You will need two red feather boas, one foil/metallic Valentine’s garland, 3 straight pins and one styrofoam wreath form.  I bought the boas after Valentine’s Day last year on clearance at Big Lots and I used the Joann Fabrics iphone app to save 40% off of the garland and the styrofoam wreath form.  The total to make this wreath was less than $10.

I started by wrapping the boa and the garland around each other.  Then I secured one end with a pin to the wreath form and started wrapping the boa/garland around the form.  The garland was longer than the boa, so I attached another boa to the form with a pin, wrapped the garland around the boa, then wrapped the boa/garland around the form, just like I did with the first one.  I ended up having to cut the second boa almost in half as it was way longer than the rest of the garland.  I secured the end to the form with the last pin, and that’s it!  No sewing, no glueing, no measuring.  And I think its super cute!.

Easy and frugal Chili Bar for Super Bowl

Photo Courtesy of McCormick

I think I’m gonna go super easy for Super Bowl this year with a chili bar. I have a ton of beans and tomatoes on hand from last weeks QFC stock up sale. I have frozen shredded cheese from Fred Meyer a few weeks back and have a ton of potatoes and onions on hand from my Bountiful baskets. I’ve got frozen dogs and boxes Nabisco crackers that were on sale around Thanksgiving. The only thing I think I’ll need is sour cream and fritos. I can deal with that. Here’s the link to our super yummy crock pot chili.  Don’t forget to look through your stock piles when it comes to entertaining. You may very well be able to make everyone happy with what you have on hand.

I think I’ll put out

Shredded Cheese
Chopped onions
Fritos (for some reason it has to be Frito’s not tortilla chips)
Hot dogs
Baked Potatoes
Sour cream
Crackers

For the cost of just a few items everyone can have what they like.  You could even make the chili vegetarian to please everyone.

.

Boston Cream Pie

My recipe drawer was a di-sas-ter!  I finally pulled the entire drawer out of the cabinet the other day and had to reach way in the back of the cabinet for all the recipes that overflowed and got smashed in the back.  Sitting down on the floor in front of the fire with a big Coke on ice, I rolled my sleeves up and dove in.  I keep most of my recipes in a card filing box with dividers.  But I am SUPER lazy about refiling them when I am done.  Anyways, I came across this recipe for Boston Cream Pie.  I’ve been wanting to try it, but was a little intimidated by the fact that the recipe calls for eleven eggs, and knew I needed to be in a “cooking for the sport of it” mood.  Well, it just so happens that I was and I gave it a try. Its a little labor intensive, but so worth the effort – delicious!

Sponge Cake
1/4 C. all-purpose flour
1/2 C. cake flour
1 tsp. baking powder
1/4 tsp. salt
1 tsp. vanilla
3 T. milk
2 T. butter
5 room temperature eggs
3/4 C. sugar

Preheat oven to 350 with the oven rack in the middle position.  Grease two 8 inch round cake pans.  Set the pans on a piece of parchment paper and trace around the bottom with a pencil.  Cut out the circles of parchment and place inside the greased pans. Whisk flours, baking powder and salt in a bowl.  Heat milk and butter in a small saucepan on low until the butter melts.  Remove from heat and add vanilla; keep warm.

Separate three of the eggs, putting the whites into the bowl of a standing mixer with the whisk attachment.  Place the three yolks and two whole eggs in another small bowl.  Beat the three whites on high speed until foamy.  Gradually add 6 T. sugar and continue to beat till soft moist peaks.  Transfer the whites to a large bowl, then put the the yolk/whole egg mixture into the standing mixer bowl.  Beat the yolks/whole eggs with remaining 6 T. sugar on medium high until eggs are thick and pale yellow in color, about 5 minutes.  Pour the beaten eggs and yolks into the bowl with the whites.

Add the  flour mixture to the  beaten eggs and whites and fold using a rubber spatula.  Add the milk mixture and fold until all the flour has been incorporated and whites and whole eggs are evenly mixed. Pour batter into prepared pans and bake until cake tops are light brown and feel firm and spring back when touched, about 20 minutes

When cakes are done, immediately run a knife around pan to loosen cakes.  Invert cakes onto large plates and remove parchment paper.  Re-invert cakes from plate onto cooling rack.

Pastry Cream
2 C. milk
6 egg yolks
1/2 C. sugar
1/4 tsp. salt
1/4 C. cornstarch, sifted
1 T. rum
1 tsp. vanilla
1 T. butter

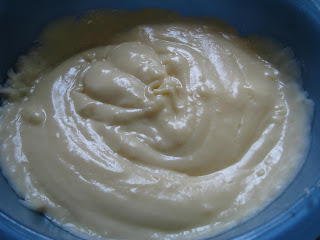
Heat milk in small saucepan until just hot.  Whisk yolks, sugar and salt in another large saucepan until mixture is thick and lemon-colored.  Whisk in the cornstarch.  Slowly whisk in hot milk a little at a time so you don’t cook the eggs.  Cook milk mixture over medium-low heat, whisking constantly until it thickens to a pudding like consistency.  Remove from heat and stir in vanilla, rum and butter. (At this point, do your best not to stick your face in the pan and eat the whole thing – this stuff is  Pour into a bowl and place a piece of plastic wrap directly onto the surface and refrigerate until firm.

Chocolate Glaze
1 C. heavy cream
1/4 C. light corn syrup
8 oz. semisweet chocolate (I used chocolate chips)
1 tsp. vanilla

Simmer cream and corn syrup over medium heat.  Remove from heat and add chocolate.  Cover and let stand for 8 minutes.  Add vanilla and stir until mixture is smooth.  Refrigerate until it has cooled to room temperature.

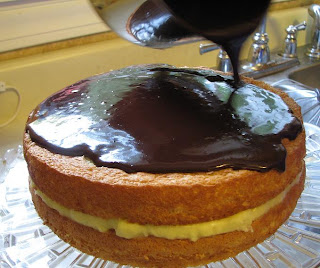
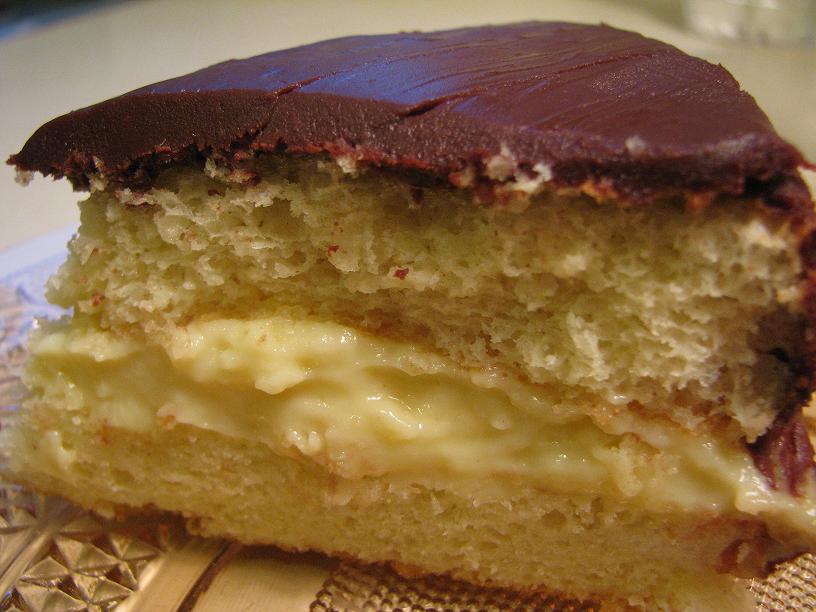
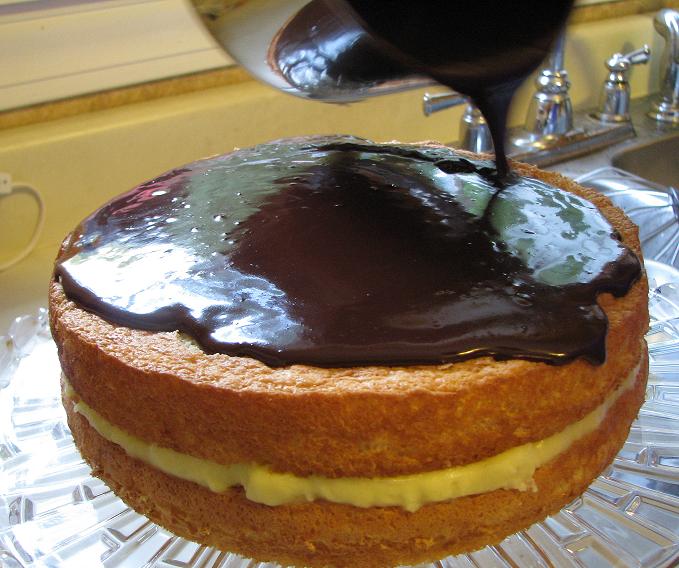
Assembly:  place one cake layer on a plate or cake stand.  Spoon pastry cream over cake and spread  to cake edge.  Place the second layer on top.  Pour glaze over middle of top layer and let flow down the sides.  Let sit until glaze fully sets, about 1 hour..

Canning Jar Soap Dispenser

My canning jar soap dispenser turned out so cute!  And it was so easy to make. The supplies you will need are:  a canning jar with a zinc lid, the cleaned out pump from a bottle of Suave lotion (which has a similar zinc color), hot glue gun, marker, nail, hammer, pliers, scissors, ruler and liquid hand or dish soap.  Now, let me show you how……

First, using a ruler, find and mark the center of your lid –

  The underneath side of the lid is made of ceramic –

With the lid right side up, and using a hammer, tap a nail through the lid on your center mark –

Carefully remove the broken ceramic from underneath the lid (it can cut you).  I used the nail to help pry out the pieces –

On the underneath side of the lid, mark an X roughly the same size as the base of your pump –

Using pliers, gently bend back the edges of your center hole –

Insert the pump into the hole –

 Hot glue the pump to the underside of the lid and let it cool –

Using scissors, trim off the excess length of the straw part of the pump so that it is about 1/4″ from the bottom of the jar –

Fill the jar with liquid hand soap, screw the lid on and that’s it!  I made this one for the bathroom, but I love it so much I think I’ll make one for the kitchen with dish soap, too.

Thanks blissfullycontent.

posted by Shelley.

Snowman (and Reindeer) Gum

This is a really fun, inexpensive holiday craft that your kids can help you with and…you probably have most of the supplies already.  These adorable snowmen and reindeer have packs of gum inside. My daughter made these once for a holiday bazaar and sold over a hundred of them at $1 each!  These are perfect little gifts for students if you are a teacher, or teach a Sunday school class because you can make a bunch fairly quickly.  I’ve given them to my bus driver, to the kid who bagged my groceries, the FedEx delivery guy, and to friends who drop by.  Finding the right size pack of gum is getting a little tricky; seems most of the gum companies have moved to the flatter packages.  I found the right size at the dollar store in packages of four for $1.

Supplies:
Packs of gum
White paper (I took mine right out of my printer)
Brown paper lunch sack
Pipe cleaners
Small pom-poms
Fine tipped black pen
Orange marker
Blush
Q-tip
Tape
Hot glue gun
Scissors
Thin ribbon
Ruler

The concept is pretty much the same for both the snowmen and the reindeer….start by cutting out a piece of the paper about 3-3/4″ x 3″.  Using tape, wrap the pack of gum just like a little tiny present….

For the snowmen:  flip the gum over and using the fine tipped marker, draw on eyes, an open triangle for the “carrot” nose, a crooked smile and three heart shaped buttons.  Color in the nose with the orange marker.  Use the Q-tip to apply a little blush to his cheeks.

To make the snowman’s earmuffs, cut a 2″ piece of pipe cleaner, bend it and hot glue it to the snowman’s head.  Now glue on a pom-pom to each side of the snowman’s head to complete his earmuffs. Tie a ribbon around his “neck” for a scarf and you’re done. Have fun with all the color combinations you can make with the pipe cleaners, pom-poms and ribbon.
For the reindeer:  Omit the heart shaped buttons and “carrot” nose, and instead of earmuffs bend the pipe cleaner to form antlers and hot glue on.  Hot glue on a pom-pom to make his nose (use red for Rudolph’s nose, or a black pom-pom for all the other reindeer).

.

Halloween Wreath

Isn’t this gorgeous!?  I found the ‘how to’ for this super simple tulle Halloween wreath on the ourbestbites website. (You can go there and check it out, but you’ve got to promise to come back, ok?)  Here’s what you need:
 An 8″ styrofoam wreath
3 spools of black tulle
Various faux flowers – I used purple mums, black roses and orange raniculus
Feathery picks – love the purple fuzz and green iridescence

So to begin with, cut lengths of tulle, mine were about 18″ long.  My wreath used about 2 and 1/2 spools of tulle.  Start tying and knotting the tulle strips around your wreath.  What I did was, I layed two strips of tulle together and tied it around the wreath, and then used a single strip of tulle on the next tie. So there was a double thickness of tulle, every other tie…make sense?  Single tulle strip, then double tulle strip, then single tulle strip, then double, etc. Squish the strips together tightly, so you can’t see the green wreath peeking out!

Now, fire up your glue gun.  Either cut off or pop off the flower heads from the picks.  Lay the flowers and feathers around the wreath until you like the arrangement.  Then start gluing them on.

Simply beautiful!

.

Fabric Banner

I really like a fabric banner my friend has in her house and was toying with the idea of making my own.  Then I saw another one on Stephanie Lynn’s website (which is totally awesome and I’m going to make her skewer starburst mirror soon…I’ll post the results) and thought “darn it, I’m doing it, I’m making one”.  I have these windows around our bathtub where I usually hang a Christmas garland during the holidays and every year when I take it down, the bare walls just glare at me. 

So off to Jo-Ann Fabrics I went with my 40% off coupon in hand.  I picked out these 5 fabrics in the “fat quarters” section and a package of extra wide double fold bias tape in olive.  I paid $7.73 for everything after coupons.
I cut a triangle out of a piece of paper approximately 6″ wide and 8″ long to use as a template.  I ironed each piece of fabric, then folded it in half, right sides together, and ironed it again.  I used a cutting mat, rotary cutter, ruler and triangle template to cut out each triangle. I didn’t use any pins or draw any lines, I just winged it.
Once all the triangles were cut out (I cut out 10 triangles – 2 from each piece of fabric –  but I messed one up, so I ended up with 9), I then sewed along the two sides of each individual triangle.
Once sewed, I turned the triangles right side out and used a pencil to straighten out the points and then ironed them flat.  I ironed the bias tape to make it look smooth (note:  bias tape comes folded, I did NOT open it up and iron the fold, I only ironed the tape to get the creases out from being packaged).  I folded the bias tape in half (end to end) to find the middle point and then unfolded it and layed it out on the floor.  I lined up the middle of the top edge of one triangle with the middle point of the bias tape, and then arranged the rest of the triangles, moving them around until I liked the order they were in.  I opened up the bias tape and inserted the flat, unsewn edge of each triangle top.  I closed the bias tape and pinned the top edge of the triangle inside. I just “eyeballed” the spacing between triangles. When all the triangles were pinned to the bias tape,  I sewed along the entire length of the tape, catching the triangles that were tucked inside.  When I tacked it up on my bathroom wall to see how it looked, it was too long, so I ended up taking one of the triangles out.  I also folded over the bias tape and sewed it to make a loop on each end and then cut off the extra tape.  Here’s the finished product…..I like it!  

It took about two hours to make.  Of course I always get inspired at the weirdest times to get crafty and this was during dinner time (I didn’t want to stop so we had sandwiches). I am also not the greatest seamstress…luckily, this was nothing but straight lines.  But I would like for you to meet my new BFF….she came in handy more than once.

If you aren’t into sewing, All You has a no-sew banner that’s really cute too.

.

Birdcage Terrarium

While at a cute little gift shop, I saw and fell in love with a birdcage terrarium. Priced at $55, it was way out of my budget, but it got me thinking….I had a birdcage at home, and a bird’s nest.  So here is my version of a birdcage terrarium; and I love it.  I started with the birdcage I bought at a garage sale and never really knew what to do with.  Luckily, the bottom is removable on this cage and that made it easier to assemble. I bought 3 plants: a fern, an asparagus fern and a nerve plant ($2.99 each), plus a clear plastic tray (.99 cents) which I had to cut the upper lip off to get it to fit. I put all three plants (pots and all) in the plastic tray.  I have some birds nests on the front porch I use for decoration, so I used one of those and put in a few toasted marshmallow Jelly Bellys as bird eggs.  Lastly, I stuck in a small branch of corkscrew willow. Wa – la!  A totally cute birdcage terrarium for around $10!.

« Older Entries