Archive for Tips

My cleaning cart

Okay, you know we’ve all done it.

We’ve been cleaning up in the living room and found a brush; so we march off to the bathroom to put the brush away.

While in the bathroom notice we’re out of TP; so you run off to get some TP.

Then, while in the garage getting in to my TP storage, I notice a scoop I was missing.

I pick up the scoop and take it in to the kitchen and notice the dishes are undone.

Sooooo I start the dishes.

Meanwhile, the living room never got picked up  and I’m looking around thinking nothing ever gets completed. Then it’s too late to do anything about it and  I have to run off to work and nothing got done. Except maybe the dishes if I’m lucky.

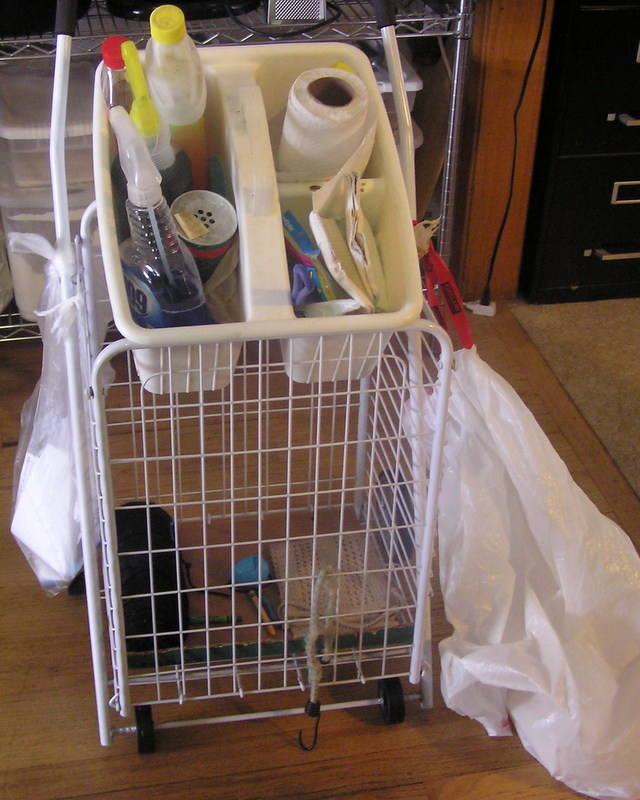
So, I came up with this nifty cart idea. It’s just a simple cart on wheels that folds flat. I got the idea while watching maid service at a hotel. They never have to run off to put something away or pick something up. Everything they need is right there with them.

The reason it works so well for me is that I never have to leave the room I’m in. I have everything I need right there. I tied a laundry bag on one side, a recycling bag on the other and a garbage bag on the back (not pictured). My cleaning supplies are in the hand tote.  I take out the tote when I get to the room I’m cleaning and use the basket to gather anything that doesn’t belong in that room. It really is quite efficient. When I get to the next room I take out anything I gathered in the basket that belongs in that room and drop it off then proceed to clean, gather, sort and move on.

Oh and one last tip. EMPTY the cart and hang it back up when you’re done. I’ve spent plenty of time looking for something I put in that cart. I just rolled the thing out the garage and dumped it off without emptying it first which is All too tempting to do. But be sure to allot enough time to empty it out and put stuff away after your last room.

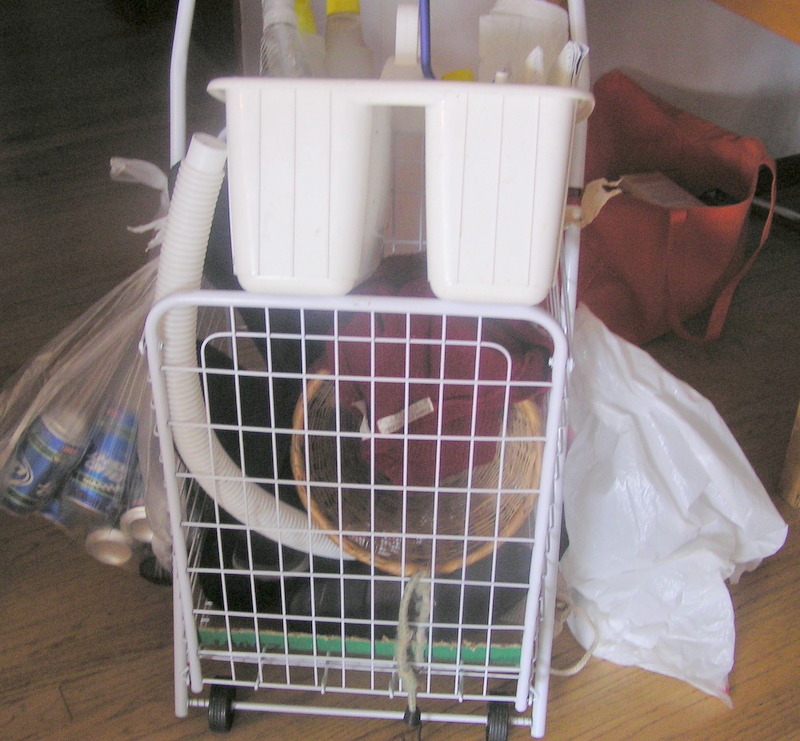
Here’s a pic of the cart after a trip through my living room (pay no attention to those empty beer cans)..

My Yahoo inbox is ridiculous. I have over 63,205 unread emails. So, if I haven’t answered an email you’ve sent me, please forgive me. I was trying to clean it out but I only knew how to do 100 at a time. But, I have found a better way.

Go to Options
Mail Options
Under Behavior – check a scrolling list and 200 messages view

Now you can clean out more than 100 at a time. You can search for emails and it will list them all in that category. Once they are listed you can go under the cog (the cog is the little icon that looks like a flower or a cog in a wheel. Its next to the spam and trash icon near the top) and choose select all. Then you can delete all in that search. No more deleting 100 at a time. 

.

Canning Jar Soap Dispenser

My canning jar soap dispenser turned out so cute!  And it was so easy to make. The supplies you will need are:  a canning jar with a zinc lid, the cleaned out pump from a bottle of Suave lotion (which has a similar zinc color), hot glue gun, marker, nail, hammer, pliers, scissors, ruler and liquid hand or dish soap.  Now, let me show you how……

First, using a ruler, find and mark the center of your lid –

  The underneath side of the lid is made of ceramic –

With the lid right side up, and using a hammer, tap a nail through the lid on your center mark –

Carefully remove the broken ceramic from underneath the lid (it can cut you).  I used the nail to help pry out the pieces –

On the underneath side of the lid, mark an X roughly the same size as the base of your pump –

Using pliers, gently bend back the edges of your center hole –

Insert the pump into the hole –

 Hot glue the pump to the underside of the lid and let it cool –

Using scissors, trim off the excess length of the straw part of the pump so that it is about 1/4″ from the bottom of the jar –

Fill the jar with liquid hand soap, screw the lid on and that’s it!  I made this one for the bathroom, but I love it so much I think I’ll make one for the kitchen with dish soap, too.

Thanks blissfullycontent.

posted by Shelley.

The Dirty Dozen and Clean 15

I saw organic bananas in the produce section and wondered, “Why would I buy organic bananas if I’m just going to peel them anyways?  Wouldn’t all the bad chemicals be on the peel? Which fruits and vegetables should I be buying organic?”. Then, the other morning as I was hitting the snooze button on the alarm for the umpteenth time, a news story came on KOMO news-radio about the “Dirty Dozen and Clean 15”.  The Dirty Dozen are the top twelve fruits and vegetables that had the highest pesticide residue, meaning you should buy these organic or grow them yourself.  The Clean 15 are fruits and vegetables that had little to no traces of pesticides and don’t need to be bought organic.

The Dirty Dozen –

  • Apples
  • Celery
  • Sweet bell peppers
  • Peaches
  • Strawberries
  • Spinach
  • Nectarines (imported)
  • Grapes
  • Lettuce
  • Cucumbers
  • Blueberries (domestic)
  • Potatoes

The Clean 15 –

  • Onions
  • Sweet corn
  • Pineapples
  • Avocado
  • Cabbage
  • Sweet peas
  • Asparagus
  • Mangoes
  • Eggplant
  • Kiwi
  • Cantaloupe (domestic)
  • Sweet potatoes
  • Grapefruit
  • Watermelon
  • Mushrooms

To read the full article, go here. .

My $5 Jar

Times Square

My daughter, Kelly, and I just got back from a week long vacation in Connecticut, where we visited my oldest sister, Sharon, and my niece, Alyse.  We got to stay in an adorable little cottage on the coast of Rhode Island for a weekend, saw New York City for the first time, and ate EVERYTHING in sight!  The food… oh it was obscene the amount of food we ate.  But the pizza and the Italian food on the east coast is so, so good we had to get our fill.  We’ve been back a week and I’m still full!

Pepe’s Pizza

The Hot House Sandwich from Southford Pizza

Months before we left for our food orgy, I started a $5 jar so we could have some extra “fun money”.  I lined the inside and bottom of a large pickle jar with paper, made a slit in the lid and hot glued the lid on.  Every time I got a $5 bill, I put it into this jar. I was a little concerned as to how to break the jar open and sift through all the broken glass to get the money out, but then Kelly gave the glued on lid a twist and off it came – so much for security. After only a few months, I had saved $320.  Saving $5 here and there was really easy. I glued the lid back on the jar and have started to save my $5 bills again – I’m not sure what I’m going to use them for – maybe Christmas shopping?  a vacation next year?

Make your own $5 jar and start saving for whatever you like.  You’ll be surprised at how fast it adds up.

.

How To Cut A Mango

I got the free McDonalds Mango/Pineapple smoothie coupons not long ago and tried them out.  I really liked them so I decided to give them a try at home.

I had a box of mangos from Costco that were getting too ripe, so I decided to freeze them for smoothies. Here’s how to cut up a Mango:


Cut off the sides, running your knife along the edge of the seed.

Score up and down (note to self: don’t hold the mango and use a sharp knife at the same time). Put the mango on the cutting board and score down to the mango skin. I didn’t cut myself but realize looking at this picture that it doesn’t look safe so use your judgement.


Flip it inside out.

Cut off the chunks

Squeeze the pulp that covers the seed to get all the juice. Put in bags and freeze. It’s that easy.

Posted by Picasa

.

Canning 101

With the abundance of free garden produce and berries this time of year, what better way to take advantage of them then can them?  Suzanne and I got together and made zucchini relish, blackberry jam and raspberry jam.  Canning is super easy and is a fun afternoon project especially with a friend or family.  We started off by making zucchini relish ~ a great relish for hot dogs, to add to your homemade potato salad or just as a side.  My neighbor had given us some huge zucchinis from his garden. We’re both going to shred the rest and freeze in 2 cup portions for making zucchini bread all fall and winter.

Ball has a great intro to canning on their website, but the basics are:

1)  Wash jars, lids and rings in hot soapy water.  After washing, we simmer the lids and rings in hot water until ready to use.
2)  If the recipe calls for hot water processing, fill canner half full with water, or enough to be able to cover the sealed jars completely, and simmer until ready to use.
3) Prepare your recipe exactly as written – this is not the time to experiment as even the slightest change can throw off the balance of the recipe.
4) Fill each jar and wipe the rims clean.  Place the lids on, then twist on the rings till tight.
5) Process according to the recipe.  Some recipes require water baths, while others do not.

Shawn Heffron VanderPuten’s recipe for Zuchini Relish

10 C zucchini, chopped (about 9 med.)
4 C onions, chopped (about 3 lg)
5 Tbsp salt
Mix the above and let stand overnight – rinse and drain (then squeeze the water out)
1 Tbsp cornstarch
2 tsp celery seed
1 sweet red pepper, chopped and seeded
1 green pepper, shopped and seeded
5 C sugar
2 1/2 C vinegar
1 Tbsp tumeric
1 tsp black pepper
Add remaining ingredients and simmer 30 minutes
Pour into hot sterilized jars and seal (I process for 10 minutes) Makes about 7 pints

After sitting overnight, the zucchini is rinsed
A pretty color addition of red and green peppers

Filling the jars
Suzanne’s great idea to use a magnet to pick up the hot lids
and rings out of the simmering water
We used a turkey fryer to process the canned relish

For the blackberry jam and raspberry jam we both had frozen berries; we each picked berries right out of our yards ~ we had tons of blackberries and Suzanne had beautiful raspberries this year.  We followed the instructions inside the SureJell package to make cooked jam which was basically to crush the fruit (which we do by hand or you can use a potato masher) and put in a large pot, mix in one box of SureJell and let come to a full rolling boil.  Next, add the sugar (which is a lot, but remember you only use a small amount on a PB&J or toast) and let that come to a full rolling boil.  Pour the hot jam into the prepared jars and seal.  We used the processing method where after the hot jam is poured into the jars and sealed, you simply turn the jars upside down for 10 minutes, then turn right side up again.

Letting the jam sit upside down for 10 minutes

Its fun to hear the sound the lids make when they complete their vaccuum seal – its a little metal popping sound…..and look at the beautiful rewards…….

.

Corn on the cob for a crowd

Life Hacker posted a great tip today on cooking corn on the cob for a crowd. Just fill a clean cooler with the corn and pour boiling water over it. Shut lid and wait 30 mins. Voila! Done! This is so much easier than trying to boil them in a pot or trying to fit them all on the grill..

« Older Entries