Archive for December 29, 2011

Limencello

I have discovered that I love Lemon Drops.  After seeing an article in a magazine about Limencello, then watching Giada make it on one of her shows, I thought I’d give it a shot.  Although it is not technically a Lemon Drop, but more of an Italian lemon liqueur, it still has that great lemony taste I was after.  It is super yummy added to iced tea and lemonade and makes a great hostess gift.  If you are going to serve it as a mock Lemon Drop, first rim the martini glasses with lemon juice then dip in (Suzanne’s brilliant idea) crushed up Lemonhead candies.  Then shake up the Limencello with some ice and strain into the glasses.  With only 4 ingredients (including water), it is super easy (lemon peasy) to make.  Here’s what you need to start off with:

10 Lemons
1 (750ml) bottle of Vodka

Using a vegetable peeler, remove the peel only (not the white pith) from the lemons and place in a 2 quart pitcher.  Pour in the entire bottle of vodka.  Cover with plastic wrap and let the peels steep for 4 days at room temperature.

After the 4 days of steeping, make a simple syrup by stirring 3-1/2 C. water and 2-1/2 C. sugar in a large saucepan over medium heat until the sugar is dissolved.  Cool completely.  Pour the cooled simple syrup into the vodka/lemon peel mixture.  Cover the pitcher and let stand at room temperature overnight.

Strain the Limencello through a mesh strainer and discard the peels. 

Using a funnel, fill pretty bottles with the finished Limencello.  Seal the bottles and refrigerate at least 4 hours and up to 1 month.

I made fresh squeezed lemonade with all of the peeled lemons by juicing them, adding simple syrup (recipe above) and enough water to make the right concentration..

Fred Meyer Rewards

Here’s something I learned the other day thanks to a very helpful sales associate at Fred Meyer… when you have a rewards coupon for say 20% off of apparel with a limit of 4 for example, and you are only buying 1apparel  item, instead of surrendering the coupon over to the cashier (like I always did), you can have the cashier write on the coupon that you have 3 items left to reach your limit and give you the coupon back!  They won’t do it unless you ask.

Also…rewards coupons can be combined with other Fred Meyer store or bonus coupons (unless otherwise stated on the coupon).

Fred Meyer has a great rewards program…if you haven’t signed up yet,  you should…it is totally worth it!.

Snowman (and Reindeer) Gum

This is a really fun, inexpensive holiday craft that your kids can help you with and…you probably have most of the supplies already.  These adorable snowmen and reindeer have packs of gum inside. My daughter made these once for a holiday bazaar and sold over a hundred of them at $1 each!  These are perfect little gifts for students if you are a teacher, or teach a Sunday school class because you can make a bunch fairly quickly.  I’ve given them to my bus driver, to the kid who bagged my groceries, the FedEx delivery guy, and to friends who drop by.  Finding the right size pack of gum is getting a little tricky; seems most of the gum companies have moved to the flatter packages.  I found the right size at the dollar store in packages of four for $1.

Supplies:
Packs of gum
White paper (I took mine right out of my printer)
Brown paper lunch sack
Pipe cleaners
Small pom-poms
Fine tipped black pen
Orange marker
Blush
Q-tip
Tape
Hot glue gun
Scissors
Thin ribbon
Ruler

The concept is pretty much the same for both the snowmen and the reindeer….start by cutting out a piece of the paper about 3-3/4″ x 3″.  Using tape, wrap the pack of gum just like a little tiny present….

For the snowmen:  flip the gum over and using the fine tipped marker, draw on eyes, an open triangle for the “carrot” nose, a crooked smile and three heart shaped buttons.  Color in the nose with the orange marker.  Use the Q-tip to apply a little blush to his cheeks.

To make the snowman’s earmuffs, cut a 2″ piece of pipe cleaner, bend it and hot glue it to the snowman’s head.  Now glue on a pom-pom to each side of the snowman’s head to complete his earmuffs. Tie a ribbon around his “neck” for a scarf and you’re done. Have fun with all the color combinations you can make with the pipe cleaners, pom-poms and ribbon.
For the reindeer:  Omit the heart shaped buttons and “carrot” nose, and instead of earmuffs bend the pipe cleaner to form antlers and hot glue on.  Hot glue on a pom-pom to make his nose (use red for Rudolph’s nose, or a black pom-pom for all the other reindeer).

.

Holiday Kisses

Here’s a great frugal tip to have Hershey’s Kisses around for the next couple of holidays.  Buy the bags of the green, silver and red Kisses when they go on clearance after Christmas.  Put the silver ones out for New Years, the red ones out at Valentine’s Day and the green ones out for St. Patrick’s Day.  Everybody loves a good holiday kiss, right?


.

I LOVE my new wrapping station!!

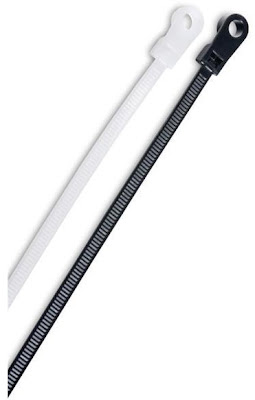
I love my new wrapping station. I bough six dowels at ACE when they had the 50% coupon last weekend. I got the wire ties that have a screw hole in them and attached them to the wall above my freezer. The chest  freezer is a perfect height for me to wrap at and the project is contained in the garage so my bed and dining room table don’t turn into a paper war zone.  I hung my scissors and tape next to them. I also hung a clear shoe bag (the kind you put on the back of a door) near it with my bow and gift tags. I feel so ready to wrap!! After the holidays I’ll swap these out for my birthday wrapping papers. My frugal tip on buying wrapping paper is to look at the price per inch. Every year I buy one huge roll of reversible paper from Costco. After a few years you get a nice variety of colors. Each roll counts as two papers since it’s reversible. Even though there are pretty variety packs, you pay for it. It’s costs more per inch to get variety. I got some door buster paper from Walgreens one year and it was so cheap and thin that it was hard to cut and tore at the package corners. You get what you pay for in wrapping paper. Happy Wrapping!

.

Homemade toffee

Toffee always makes a nice gift and keeps well. It’s something I can make early in the month and box up as gifts for neighbors, mail man, UPS and Fed Ex (have I mentioned how much I LOVE Amazon prime!) Anyway, if you’re itchin to get baking but it’s too early in the month then whip up some toffee. I love the crumbs leftover on the pan. I put them on ice cream and am in heaven. Good the the last crunch. I used to make peanut brittle and toffee on the same night buf found toffee to be so incredibly easy that I make it more often. Only three ingredients that I always have on hand. Once you’ve made it a few times you will begin to recognize the color and smell of when it is perfect. It helps to start with a candy thermometer or the ice water test. The ice water test is taking a bit of the toffee on a spoon and dipping it in to ice cold water. If it hardens up it’s toffee. If it is still soft, it’s caramel. I used that method for years because I couldn’t afford a candy thermometer. It served me well. If you’re doing this with kids be super careful. It’s lava hot and a drip will burn you. I waited till they were a bit older before I let them help me with toffee. I made this once and took it in to work and put in the break room. A co worker who came in after me said “you’ve got to get in to the break room fast, there’s some amazing toffee and it’s going fast”. Made my day……

Toffee
1 C chopped nuts (optional -but if you wanna make almond roca, then use almonds. I personally use any nut I have on hand, it’s all good)
3/4 C packed brown sugar
1/2 C butter
1/2 C chocolate chips (I don’t really measure the chocolate chips I just start pouring them on and spreading around till it looks like enough)

Butter a pan you are going to spread the hot toffee on to. If you are using nuts put the chopped nuts over the butter. Heat sugar and butter to boiling in a 1 quart saucepan, stirring constantly. Boil over medium heat, stirring constantly, 7 minutes. Immediately spread mixture over pecans in pan. Sprinkle chocolate chips over hot mixture and spread. When it cools, cut or break it up. Yummy!

Posted by Picasa

.