Archive for Recipes

Chicken Under A Brick

Chicken under a brick is a method of baking or bbq’ing a chicken under the weight of a foil lined brick.  I had a whole fryer in my freezer from when QFC had them at a stock up price (.68 cents a pound, if I remember right).  What you do is, you take kitchen shears (which I don’t have and is now on my Christmas list) or a sharp knife and carefully cut out the backbone.  Turn the chicken breast side up and press the chicken down firmly to get the chicken to be as flat as possible.  Now season the heck out of it on both sides.  I used garlic powder, Monterey steak seasoning, coriander, celery salt and pepper, but you can use anything you have on hand.  Rub some spices as far under the skin as you can, and season the outside of the skin, too.

Put the chicken on a grill, breast side down, over medium heat. Instead of wrapping a brick in foil and setting it on top of the chicken to weigh it down, I just laid a piece of foil over the chicken, and set my big heavy cast iron skillet on it.  Then a light bulb went off and I thought “What if I cook my green beans in the skillet at the same time the chicken is cooking?”.  Brilliant!  So, I loaded up the skillet with green beans, Walla Walla sweet onions, a little olive oil and some salt and pepper and set it right on top of the foil I had laid over the chicken.

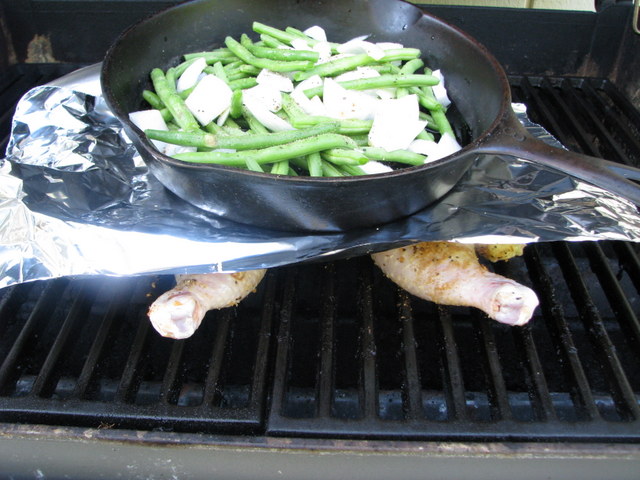
(That picture reminds me of when Dorothy’s house fell on the Wicked Witch of the East, see those legs sticking out?).  Now close the grill and cook the chicken for about 20 minutes.  Remove the brick (or skillet and the foil) and turn the chicken over.  I set the skillet right on the bbq grill next to the chicken and let it continue to cook. You will no longer need the brick at this point.

Continue to cook the chicken for another 15-20 minutes, or until the juices run clear.

Crispy skin, juicy, tender meat.  Yummy green beans.  This was a really frugal meal since I had stocked up on the chicken when it was cheap, the green beans came from my Bountiful Baskets produce co-op, and we had a salad made from lettuce and cucumbers from my garden.

Posted by Shelley .

Raspberry Jam

My neighbor came over and asked me if I wanted to pick some raspberries from his yard.  Hmmm, let me think about that for a nano-second – heck ya I do!  I grabbed a bowl, a dozen eggs to trade for the berries, and my daughter and off we went.  An hour later we had this big beautiful bowl of raspberries.

 Peeps was curious about what was in the bowl….

I made one batch of jam which, besides the sugar and pectin, cost me next to nothing to make.  I already had everything I needed from making strawberry jam the other day, plus the raspberries were free. And, I froze enough raspberries to make another batch later. Woohoo!

Is this the yummiest PB&J you’ve ever seen or what?

Posted by Shelley.

Strawberry Jam

It’s that time of year again…time to make strawberry jam.  On a whim, I stopped by Carpinito’s in Kent just to look around and found this beautiful flat of strawberries.  So I bought it…..

and that sent me into full strawberry jam making mode; fresh berries can’t sit around for very long.  I made two batches of jam out of this flat and had two quart size bags of berries left over that I put in the freezer.  “So is making homemade jam frugal?”, you might ask. I made 6 pint jars and 8-8oz jars of jam.  At Safeway, Smucker’s strawberry jam priced out at $3.79 for the pint size and $3.19 for the 8oz size for a total of $48.26.  I paid $21.95 for the berries, and $16.95 for the supplies – sugar, two boxes of SureJell pectin and two boxes of lids for a grand total of $38.90.   That’s a savings of almost $10 – but – I already had all the jars.  If you had to go out and buy the jars (which you can find at garage sales quite often) then you may come out a little behind.   But whether I save money or not, it is something my mother taught me and I love doing it….it makes me feel homey.

And the chickens benefited too….

although they were acting a little skittish.  You don’t think this had anything to do with it, do you?

This is what happens when you have two bored boys, an old dead riding lawn mower and a red wagon. (Although I was quite proud of them for getting that old hunk of junk going, and yes, they removed the mower blade). By the way, I never knew a riding lawn mower could do wheelies.  Did you?

Anywho, if you would like to try making your own jam (it’s super easy and SO much better than store-bought), just follow the directions in the SureJell package – that’s all I do.  And when you see the sugar to berry ratio in the recipe, don’t try to cut back on the sugar, your jam will not set.  Just remember that jam is a condiment, a confection really, and that you are only eating a small amount at a time, not a whole jar.

Posted by Shelley .

Cuban Pork Sandwiches

I got a hankerin’ for a Cuban Pork Sandwich the other day.  If you’ve never had one before, you simply must give them a try – they are totally delicious.  Paseo’s in Ballard has an awesome Cuban roast sandwich.  A little different than a traditional Cuban Pork Sandwich, Paseo’s is spicy, totally messy and on the most wonderful bread imaginable.  We were in Florida last summer, and I was so anxious to try a real authentic Cuban sandwich.  I must say, I was sorely disappointed.  I don’t know if it was that particular restaurant or that area of Florida that we were in, but I never saw it coming…I thought for sure these would be the all time best sandwiches ever.

So anyways, I had a pork roast in the freezer and thought I’d give it a shot.  So glad I did – yum!

CUBAN PORK SANDWICHES
2-3 pound pork shoulder roast
1 onion, coarsely chopped
3 cloves of garlic, peeled and quartered
5 T. vinegar
2 T. dried oregano
1 tsp. salt
1/2 tsp. red pepper flakes
6 soft French rolls
1/2 lb. deli ham lunchmeat
6 slices swiss cheese
mustard
pickle slices

Place the onions and garlic into a large stock pot.  Put the roast on top of the onions and garlic.  Pour the vinegar over the top of the roast, and sprinkle with the oregano, red pepper flakes and salt.  Fill the pot halfway with water.  Put the lid on the pot and set over medium heat for 20 minutes, then turn down to low and simmer for 1 1/2 hours.

Flip the pork over and simmer for an additional 1-1 1/2 hours.
Let the pork cool for a bit, then remove from the pot and shred using your hands or forks.  Return the shredded pork back to the pot and keep warm.

Slice the rolls in half and spread each side with mustard.  Arrange the swiss cheese, ham, shredded pork and pickles and top with the other slice of the roll.  Grill or cook the sandwich in a press until the cheese is melted and the sandwich is warmed through..

Limencello

I have discovered that I love Lemon Drops.  After seeing an article in a magazine about Limencello, then watching Giada make it on one of her shows, I thought I’d give it a shot.  Although it is not technically a Lemon Drop, but more of an Italian lemon liqueur, it still has that great lemony taste I was after.  It is super yummy added to iced tea and lemonade and makes a great hostess gift.  If you are going to serve it as a mock Lemon Drop, first rim the martini glasses with lemon juice then dip in (Suzanne’s brilliant idea) crushed up Lemonhead candies.  Then shake up the Limencello with some ice and strain into the glasses.  With only 4 ingredients (including water), it is super easy (lemon peasy) to make.  Here’s what you need to start off with:

10 Lemons
1 (750ml) bottle of Vodka

Using a vegetable peeler, remove the peel only (not the white pith) from the lemons and place in a 2 quart pitcher.  Pour in the entire bottle of vodka.  Cover with plastic wrap and let the peels steep for 4 days at room temperature.

After the 4 days of steeping, make a simple syrup by stirring 3-1/2 C. water and 2-1/2 C. sugar in a large saucepan over medium heat until the sugar is dissolved.  Cool completely.  Pour the cooled simple syrup into the vodka/lemon peel mixture.  Cover the pitcher and let stand at room temperature overnight.

Strain the Limencello through a mesh strainer and discard the peels. 

Using a funnel, fill pretty bottles with the finished Limencello.  Seal the bottles and refrigerate at least 4 hours and up to 1 month.

I made fresh squeezed lemonade with all of the peeled lemons by juicing them, adding simple syrup (recipe above) and enough water to make the right concentration..

Homemade toffee

Toffee always makes a nice gift and keeps well. It’s something I can make early in the month and box up as gifts for neighbors, mail man, UPS and Fed Ex (have I mentioned how much I LOVE Amazon prime!) Anyway, if you’re itchin to get baking but it’s too early in the month then whip up some toffee. I love the crumbs leftover on the pan. I put them on ice cream and am in heaven. Good the the last crunch. I used to make peanut brittle and toffee on the same night buf found toffee to be so incredibly easy that I make it more often. Only three ingredients that I always have on hand. Once you’ve made it a few times you will begin to recognize the color and smell of when it is perfect. It helps to start with a candy thermometer or the ice water test. The ice water test is taking a bit of the toffee on a spoon and dipping it in to ice cold water. If it hardens up it’s toffee. If it is still soft, it’s caramel. I used that method for years because I couldn’t afford a candy thermometer. It served me well. If you’re doing this with kids be super careful. It’s lava hot and a drip will burn you. I waited till they were a bit older before I let them help me with toffee. I made this once and took it in to work and put in the break room. A co worker who came in after me said “you’ve got to get in to the break room fast, there’s some amazing toffee and it’s going fast”. Made my day……

Toffee
1 C chopped nuts (optional -but if you wanna make almond roca, then use almonds. I personally use any nut I have on hand, it’s all good)
3/4 C packed brown sugar
1/2 C butter
1/2 C chocolate chips (I don’t really measure the chocolate chips I just start pouring them on and spreading around till it looks like enough)

Butter a pan you are going to spread the hot toffee on to. If you are using nuts put the chopped nuts over the butter. Heat sugar and butter to boiling in a 1 quart saucepan, stirring constantly. Boil over medium heat, stirring constantly, 7 minutes. Immediately spread mixture over pecans in pan. Sprinkle chocolate chips over hot mixture and spread. When it cools, cut or break it up. Yummy!

Posted by Picasa

.

Twice Baked Sweet Potatoes

Twice baked sweet potatoes….what a revelation.  Maybe all of you foodies out there have thought of this or heard of this already, but I have not.  It just occurred to me the other day, if you can make a twice baked potato out of a regular russet potato, why couldn’t you with a sweet potato?  And what a fun way to serve sweet potatoes at Thanksgiving.  So, I experimented and tried four different versions:  Sweet potato souffle with pecans and coconut, traditional brown sugar and marshmallows, sweet potatoes with orange juice and orange zest and a twice baked sweet potato using all the same ingredients that are in a regular russet twice baked potato. Remember that one sweet potato serves two people, and I tried to pick out the more round potatoes instead of the longer, skinnier ones.  Each of the recipes below are for four whole sweet potatoes.

Start by washing and scrubbing the outside of your sweet potatoes.  Prick each potato many times with a fork (apparently I was lacking in this step as one of my potatoes exploded in the microwave). Cook for 10 minutes in the microwave, check to make sure they are fork tender.   If not, put back in the microwave and cook in one minute increments, checking for tenderness after each minute.


Let them cool so you can handle them.  Cut in half and using a spoon, scoop out all the flesh.  Use a fork to mash the sweet potato flesh to the consistency you like; a little chunky or perfectly smooth.

Sweet Potato Souffle
This was the overall winner of our “official taste test”.
To your scooped out sweet potato flesh, add:
1/2 C. brown sugar
1/2 C. melted butter
1 egg, beaten
1/2 C. milk or cream
1 tsp. vanilla

Mix all the ingredients and refill the sweet potato skins.  Mix and sprinkle on top of each potato:
1 C. brown sugar
1/4 C. flour
1 C. chopped pecans
1/3 C. shredded coconut
1/3 C. melted butter

Bake at 350 degrees for 30 minutes.

Traditional
This recipe came in second; who doesn’t love that traditional gooey marshmallow and brown sugar topping?  To your scooped out sweet potato flesh add:
1/2 C. melted butter
1/2 C. milk or cream
1/2 tsp. vanilla

Mix all the ingredients and refill the sweet potato skins.  On top of each potato sprinkle brown sugar, drizzle with melted butter, then place as many mini marshmallows as your potato can handle.

Bake at 350 degrees for 30 minutes.

Twice Baked Sweet Potato
I love, love, love twice baked potatoes with regular russet potatoes.  This recipe uses all the same ingredients and flavors with that little sweet potato surprise.  I really liked these.  To your scooped out sweet potato flesh add:
1-1/2 C. sour cream
1/2 C. melted butter
1/2 C. chopped fresh chives
Salt and pepper

Mix all the ingredients and refill the sweet potato skins.  Bake at 350 degrees for 30 minutes.   When finished baking, add a dollop of sour cream on top and sprinkle with additional chives (bacon and cheddar cheese would be great, too ~ wish I’d thought of that!)

Sweet Potatoes with Orange Essence
These were the least favorite of the judges (my husband and his friend, and the kids) but we are pretty traditional folks.  Next time, I think I’d add a little ginger.  To your scooped out sweet potato flesh add:
1/2 C. melted butter
1/2 C. orange juice
1 tsp. orange zest

Mix all the ingredients and refill the sweet potato skins.  Bake at 350 degrees for 30 minutes..

Chocolate Chip Cake

Seriously, it doesn’t get any easier than this. Mix all the ingredients together.  Stir in chocolate chips and bake. Super moist, chocolately and if you serve it while still slightly warm, your guests will volunteer to be your slaves for life.  The original recipe doesn’t call for any type of frosting or glaze, but since I can’t leave well enough alone, I made a chocolate glaze which really made it decadent.

INGREDIENTS:

1 box yellow cake mix
1 small box instant vanilla pudding
1 small box instant chocolate pudding
4 eggs
1/2 C. oil
1 1/2 C. water
1 C. chocolate chips

Mix all the ingredients except the chocolate chips with an electric mixer until well blended.  Stir in the chocolate chips.  Bake in a well greased and floured bundt pan for 1 hour at 350 degrees.  Cool for 10 minutes then turn out onto a plate.

GLAZE:
1 C. heavy cream
1/4 C. light corn syrup
8 oz. semisweet chocolate chips
1/2 tsp. vanilla

Bring cream and corn syrup to a simmer over medium heat.  Take off heat and stir in chocolate chips.  Let stand till melted, about 8 minutes.  Add vanilla and stir until the glaze is smooth.  Cool to room temperature.  Pour over cake so it drizzles down the sides.

.

Meatball Subs

My son had been out of school for most of last week with strep throat.  One of the assignments he missed in school and needed to make up over the weekend was to make a meatball sub for his Creative Cooking class.  I love that he is taking this class.  I think every guy needs to know his way around the kitchen. Let me tell you, this kid made some dee-licious meatball subs.  Here’s what he did….

Meatballs
1 pound hamburger
1pound hot italian sausage
1/2 large onion, finely chopped
2 cloves garlic, minced
2 T. fresh parsley, chopped
1 egg
2 slices bread
1/2 C. cream

Preheat oven to 350 degrees.  In a large bowl, put all the ingredients, except the bread and cream.  Place the two slices of bread in a small bowl and pour the cream over.  Let the bread and cream sit for a minute or two until the bread has absorbed all the cream.  Break up the bread with your fingers and add it to the bowl with the other ingredients.  Using clean hands, mix the ingredients together lightly till just combined.  Don’t overwork the meat mixture.

Using an ice cream scoop for uniform size, scoop a ball of meat into your hands and lightly pat into a ball.  Place on a baking sheet.  Bake for 20 minutes or until done.

Tomato Sauce
1 medium onion, shredded
3 cloves garlic, minced
1-1/2 T. balsamic vinegar
2 – 28oz cans crushed tomatos
1 – 6oz container fresh basil, chopped
2 T. grated Parmesan-reggiano cheese

In a large pot on medium heat, add 2 T. olive oil. Add the onions and cook for 3-4 minutes.  Add the garlic and cook for an additional 1-2 minutes.

Stir in the balsamic vinegar and cook for an additional minute.  (I think this is the secret to this great sauce!)

Pour in (or in our case, dump in so it goes everywhere) the crushed tomatos.  

Add the basil and parmesan/reggiano cheese.  When the meatballs are done, add them, too.

Let the meatballs simmer on low in the sauce for as long as you can to flavor the sauce.  When you just can’t stand the delicious aroma anymore and have to dig in, split a french roll in half.  Dig out a little of the bread on each side.  Place a piece of provolone cheese on each roll and broil till melted.  Arrange 3 or 4 meatballs on each roll, spoon on some sauce, then top with mozzarella cheese and broil again until the cheese is melted.

And this is what you get…..

Cheesy. Yummy. Messy.

.

Beef Stroganoff

Mmmmm, comfort food to the max.  This was the best beef stroganoff I have ever made!  I had leftover pot roast in the fridge, so I whipped this up for dinner last night.  You have a lot of options for the beef in this recipe…but the leftover roast was to die for.

1 pound beef steak such as round, London broil or flank, thinly sliced – OR – 1 pound ground beef – OR – you can use leftover beef of any kind:  steak, roast, hamburger, etc.
2-3 Cups beef broth
2T. worcestershire sauce
1 pound of mushrooms (I used a mix of white button and baby portabellos), sliced in half
1/2 of a large onion, cut into a large dice
2 cloves garlic, minced
1 bay leaf
Pinch of dried thyme
2 T. flour
3/4 C. sour cream
9 oz of uncooked egg noodles

Cook noodles according to package directions.  If using steak: in a skillet on medium heat, heat 1 T. oil, add the beef and cook until browned on all sides, about 5 minutes. Transfer the meat with its juices to a plate.  If using hamburger:  in a skillet on medium heat brown the hamburger, drain off the fat and transfer meat to a bowl.  If using leftovers or after your steak/ground beef are cooked: in a skillet on medium heat add 1 T. butter and 1 T. oil.  Add the mushrooms and cook till lightly browned.  Removed from skillet into a bowl and set aside.  Add another T. of butter and T. of oil to the skillet, and cook onions till tender and starting to brown.  Add the garlic and cook for another minute or so.  Add the broth, worcestershire sauce, bay leaf, thyme, cooked meat and browned mushrooms.  Let this get hot and bubbly. (If it looks like it could use more liquid, add more broth.  The noodles will soak up a lot of the “gravy”).  Remove 1/2 C. of the liquid from the pan into a small bowl and whisk in 2 T. flour. Pour flour mixture into skillet while stirring to thicken.  Add more flour if too thin, or add more broth if too thick.  Once you reach a nice gravy consistency, turn the heat to low and stir in the sour cream.  Give it a good seasoning with pepper and taste it to see if it needs salt – the broth can be salty sometimes.  When the noodles are done, drain them in a colander, then put them back in the pan they cooked in.  Add 2 T. butter to the noodles to keep them from sticking.  Serve the stroganoff on top of the hot noodles.  Garnish with fresh, chopped parsley..

« Older Entries Recent Entries »